
H. Valters
Ethical Penetration tester / DevSecOps / IT Solution Developer / System administrator

How to set up a GitLab Runner in Docker
This blog post is about how to set up your own GitLab Runner in a Docker system. If you don’t have your own GitLab yet, then I have already created a blog post, on how to set up your own GitLab in a Docker container the post you can find here
Once we have a fully working GitLab instance ( It can be on Docker or even Bare Metal server hosted ) we can start setting up a Runner that will Execute our Code do a build and etc in the Docker containers. Therefore we can use the same server on what we host GitLab if we want, but in the tutorial, I will be using a separate server.
Since my base system is Ubuntu then I will be using Ubuntu DEB. But I will add also for other vendors:
For example, for Debian or Ubuntu:
# Replace ${arch} with any of the supported architectures, e.g. amd64, arm, arm64
# A full list of architectures can be found here https://gitlab-runner-downloads.s3.amazonaws.com/latest/index.html
curl -LJO "https://gitlab-runner-downloads.s3.amazonaws.com/latest/deb/gitlab-runner_${arch}.deb"
For example, for CentOS or Red Hat Enterprise Linux:
# Replace ${arch} with any of the supported architectures, e.g. amd64, arm, arm64
# A full list of architectures can be found here https://gitlab-runner-downloads.s3.amazonaws.com/latest/index.html
curl -LJO "https://gitlab-runner-downloads.s3.amazonaws.com/latest/rpm/gitlab-runner_${arch}.rpm"
For example, for FIPS compliant GitLab Runner on RHEL:
# Currently only amd64 is a supported arch
# A full list of architectures can be found here https://gitlab-runner-downloads.s3.amazonaws.com/latest/index.html
curl -LJO "https://gitlab-runner-downloads.s3.amazonaws.com/latest/rpm/gitlab-runner_amd64-fips.rpm"
Installation process is also easy.
For example, for Debian or Ubuntu:
dpkg -i gitlab-runner_<arch>.debFor example, for CentOS or Red Hat Enterprise Linux:
rpm -i gitlab-runner_<arch>.rpmNow once we have installed the GitLab Runner we need to configure and register it by executing the following command:
sudo gitlab-runner register- It will ask for your GitLab hosted server web address ( Suggestion put your GitLab under SSL before you setup )

2. It will ask you for a GitLab registration token:
* To find the token go to https://<your-gitlab-address> login as an Administrator user
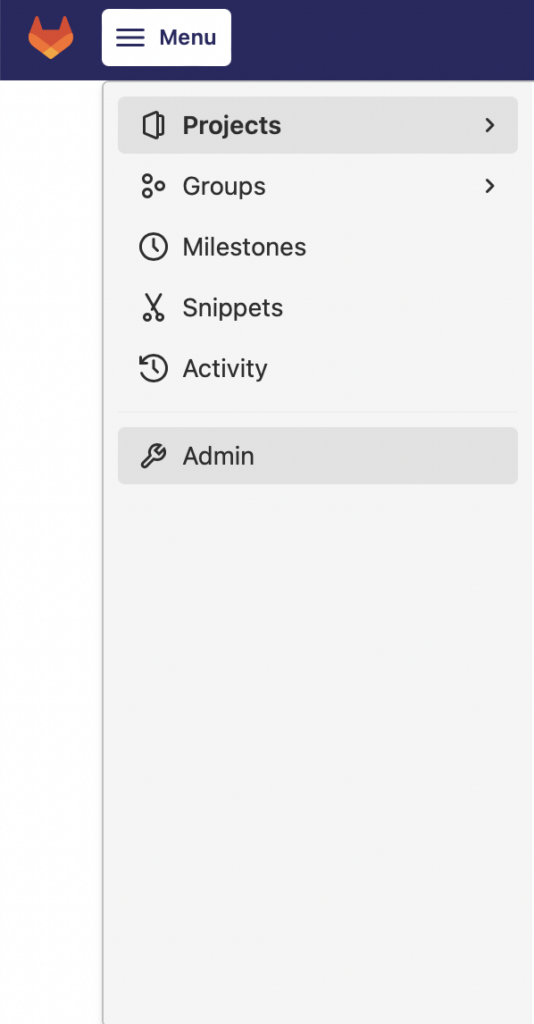
* Once you have logged in, click on Menu and then select Admin.
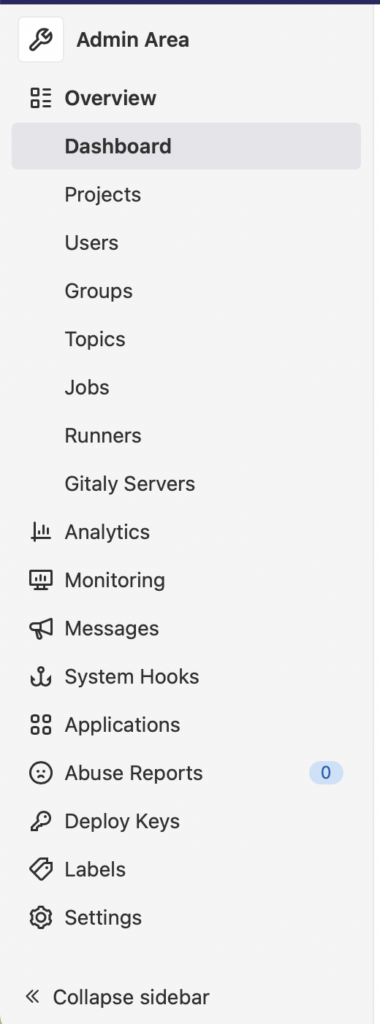
* In the Dashboard select Runners
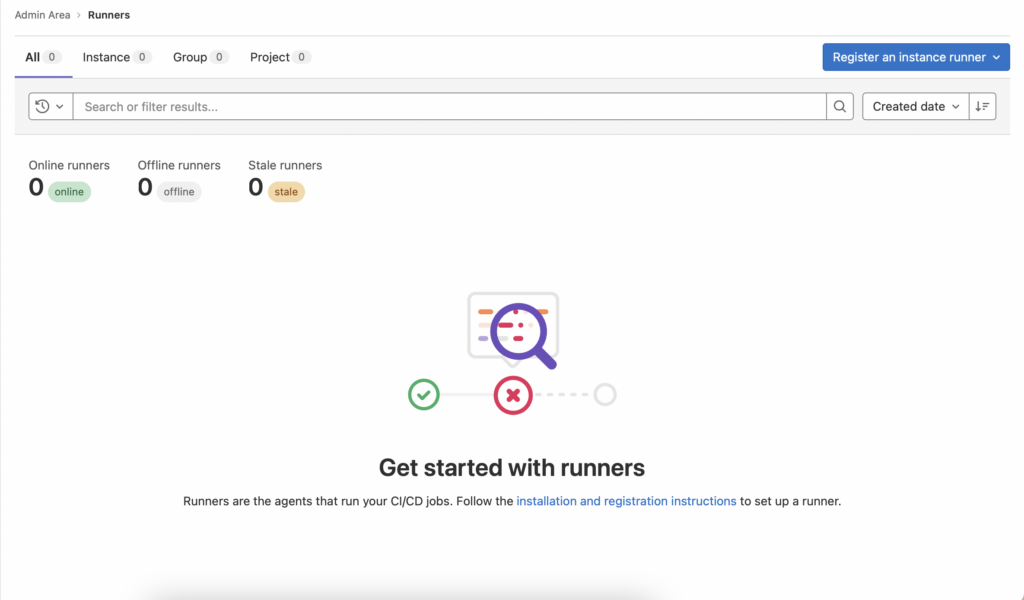
* Click on “Register an instance runner” and you will get the token.
Now return to your terminal and Enter a description for the runner:
* It Already offers your server hostname, but I enter something specific to know what server is in use if you have several Runners.
Enter tags for the runner (comma-separated):
* Click enter
Enter optional maintenance note for the runner:
* Click enter
Registering runner… succeeded runner=********* Enter an executor: docker, docker-ssh, parallels, shell, ssh, virtualbox, docker-ssh+machine, custom, docker+machine, kubernetes:
* type: docker
Enter the default Docker image (for example, ruby:2.7):
* type: ubuntu:latest
Now we need to do some changes to our GitLab configuration before we start it. So open your Linux terminal and execute:
nano /etc/gitlab-runner/config.tomlAfter concurrent = 1 add
output_limit = 900000After check_interval = 0 add
docker-network-mode = "host"
After executor = “docker” add:
builds_dir = "/home/gitlab-runner/build"Change privileged = false to:
privileged = trueChange volumes = [“/cache”] to:
volumes = ["/cache", "/var/run/docker.sock:/var/run/docker.sock"]And save
The end result should look like this:
concurrent = 1
output_limit = 900000
check_interval = 0
docker-network-mode = "host"
[session_server]
  session_timeout = 1800

[[runners]]
  name = "<your-gitlab-runner-hostname>"
  url = "https://<your-gitlab-url>"
  token = "<your-gitlab-token>"
  executor = "docker"
  builds_dir = "/home/gitlab-runner/build"
  [runners.custom_build_dir]
  [runners.cache]
    [runners.cache.s3]
    [runners.cache.gcs]
    [runners.cache.azure]
  [runners.docker]
    tls_verify = false
    image = "ubuntu:latest"
    privileged = true
    disable_entrypoint_overwrite = false
    oom_kill_disable = false
    disable_cache = false
    volumes = ["/cache", "/var/run/docker.sock:/var/run/docker.sock"]
    shm_size = 0
Once that is done, let’s do the following and create a working directory:
mkdir /home/gitlab-runner/buildLet’s allow GitLab to work with newly created working directory:
sudo chmod +x /home/gitlab-runner/buildLet’s create a GitLab user and allow it to execute bin/bash to allow create docker container
sudo useradd --comment 'GitLab Runner' --create-home gitlab-runner --shell /bin/bashLet’s install GitLab Runner to start automatically on startup and Let’s start:
sudo gitlab-runner install --user=gitlab-runner --working-directory=/home/gitlab-runner && sudo gitlab-runner startIf we go back to https:// and go to the page where we got the token, you will see your newly created runner that is in status ready.
So we now have set up a GitLab runner, that can build/Run/Deploy, and execute our project using Docker containers.
If you want to Upgrade your existing runner then you need to:
Stop the Runner:
sudo gitlab-runner stopDownload the binary to replace the GitLab Runner executable. For example:
sudo curl -L --output /usr/local/bin/gitlab-runner "https://gitlab-runner-downloads.s3.amazonaws.com/latest/binaries/gitlab-runner-linux-amd64"Give it permissions to execute:
sudo chmod +x /usr/local/bin/gitlab-runnerStart the service:
sudo gitlab-runner start