H. Valters
Ethical Penetration tester / DevSecOps / IT Solution Developer / System administrator

How to set up Gitlab on a Docker and why do you need it?
People that work in the IT field already know, the benefits of Git, how it not only increases your workflow but also helps several teams and team members to work on one project at the same time. Thanks to GIT technology we can do a version controller and at the same time better and faster trace bugs or fix issues that we have. In my knowledge, the best rule of development would be that team members or teams work on the project code, that before the building is reviewed by a team lead or Senior developer to be sure that there are no backdoors or any issues well this can be easily done by GIT and also by Gitlab CI/CD ( about Gitlab CI/CD I will create separate how-to as there are many things to explain and show). In 2022 and forward if you are developing a project that involves several developers or teams, then you definitely need GIT to not have issues and also CI/CD pipelines of deployment to avoid any issues or code conflicts also for System Administrators to easy trace issues if they occur.
My personal opinion and that is only mine is that if you or your company or you have several projects, then it is better to have your in-house hosted GIT solution, as personally all my written codes I keep in my personal Gitlab where I can control the access if needed. Personally, in this modern world, I like to keep a hand on my data and my files so that I know that they are safe and only reachable by me or by persons whom I trust and have granted access.
There are several different GIT solutions available online, like for example most popular Github.com which is owned by Microsoft at the moment, bitbucket.com, Gitlab.com also offers their hosted solutions Free and Paid versions and others. But In this and several other articles, I will be covering Gitlab solution as one of their key benefits is that you can host their solution on your own machine, yes exactly on your machine, and by using Docker you can also host it on your workstation, on any VPS or Inhouse server that can host VPS or Just any PC running Linux.
Before we start the technical part, let’s look into 10 Reasons why you should be using GIT
- Cloud repositories
As of 2017, there are still people developing code on their local machine. Do these people make backups in a USB? Do they share their code with coworkers via email or Whatsapp? Having your code in the cloud has many advantages, it is generally more secure. It is easier to work collaboratively, any team member can download the latest version of the repository from any machine. - Distributed file system
Git is distributed, meaning that every local copy of the global repository is a fully working copy. In case there is a problem with the server and the global repository is corrupted or lost, any local copy can recreate the full history. This file system architecture is the opposite of centralized file systems like Subversion (SVN), very popular before Git. In a centralized version control system, the global server contains all changes in the project and the local copies are just light versions of it. If the server goes down, you lose all the history. - Perfect to work with others
Git is designed for creating projects where many contributors develop software in parallel. Specifically, it has a very powerful way to resolve conflicts when two people are working on the same file. Its stability is much higher than SVN. Those who have used SVN knows what I’m talking about. - Good documentatio
Git has been around for many years now and it’s really easy to find good documentation. - Easy to use
Nobody can say git is difficult. To do the day-to-day work, you just need to manage these 8 commands: git clone, git status, git add, git commit, git push, git pull, git checkout and git branch. With them you can download a repo, check its status, add files, send files to the server, retrieve the latest changes on the server and create branches to work in parallel. - Branches allows for simultaneous code versions
Branches are one of the best features of a version control software and are used to develop in parallel to the main repository. A branch is a fork of the main code to develop a new feature. When you create new functionality in the code, you should create a branch. Then you develop the functionality, test it and when it works perfectly, you can integrate it or merge it into the main branch (which is usually the master branch). When using branches, you can have simultaneous versions of the same code. - Encourages code reviews
Code reviews are a good practice that every developer team should follow. Git facilitates code reviews with an operation called pull request. A pull request is a merge operation between two branches, one of them is typically the master branch. The standard workflow is the following: a developer works in a branch coding a new feature, when the feature is finished a pull request is submitted. A different developer reviews the code of the pull request and suggests improvements. Once the improvements are made, the branch is merged into master, and thus a new feature is added to the project. - It’s easy to revert your mistakes
Every time you send code to the server you make a commit. Every commit is referenced with a hash that uniquely identifies it. With git, it is super easy to revert to any past commit and fix a mistake. - It’s the current de facto open-source umbrella
If you want to develop open-source code, the biggest repository is GitHub. Here you can find the most popular repositories in Github, it includes bootstrap, react, d3, tensorflow, angular, etc. - Connectivity to cloud services
Git popularity generated the emergence of other services that complete the software development stack, sometimes called git hooks or git integrations. An interesting case is continuous integration systems like Travis. These systems allow for automatic testing of a software solution. Another useful tool is Waffle. This system helps developers to plan and track a project linked directly with GitHub. Finally, another interesting tool is Codacy that generates automatic code reviews.
This and also upcoming articles will be about Gitlab how to set up several Gitlab components and also do several tricky configurations. All the systems will be using Docker and will be hosted mostly inside Docker containers. So to start setting up the Gitlab we need a Docker if you don’t have it then you will need to install it.
Now once you have a Docker you need to decide if you want your Github to a standard GIT protocol connection or add a specific port each time you add a project to your favorite GIT management software. In my example, I want to use a standard port ( GIT pull/push is using 22 port ) and as we know Linux is using port 22 for SSH connections. So, therefore, you need to change it.
In your terminal open sshd_config ( I’m using nano editor )
nano /etc/ssh/sshd_configand remove # and change the port let’s say to 1888
Before:
#Port 22After
Port 1888Should look like:
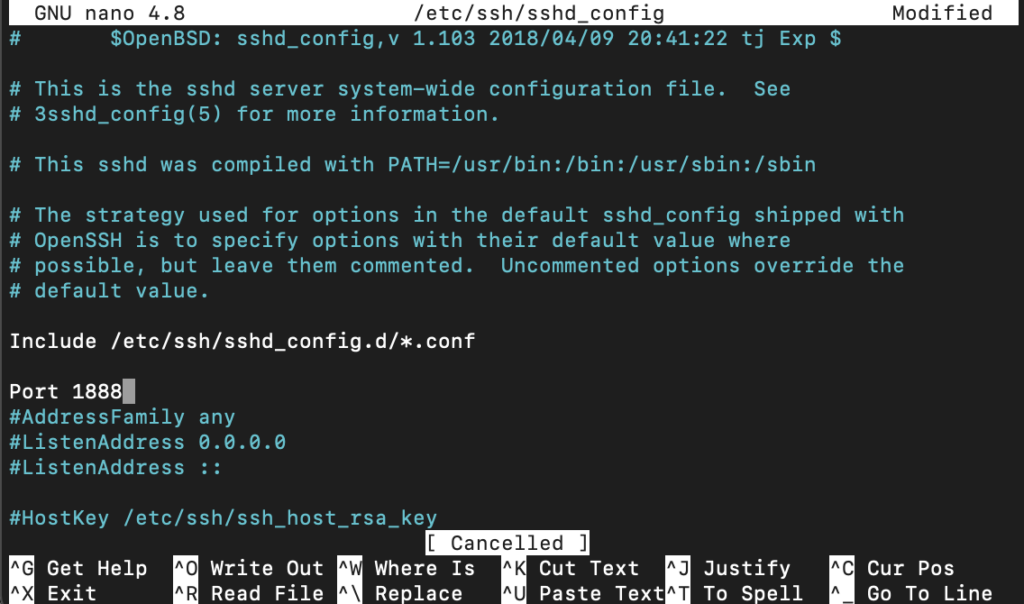
Once changes are done click Control + X after that Y and Control + M to save our changes. After the changes are saved we need to restart ssh execute in your terminal
systemctl restart sshdNow that we have changed our ssh port ( Don’t forget when you will connect to your Linux machine you will need to specify the port with -p 1888 ) Once that is done, let’s create a folder where Docker will store mapped files and folders.
In your Linux terminal execute: ( You can replace Docker with the folder name you want )
mkdir /srv/Docker/Now let’s get the Docker image and lunch the Gitlab itself
Before we start, let’s dive into the parameters and what we need to change.
- If we have changed the SSH default port, then we can level 22:22, but if you haven’t, then you need to change 803:22
- Change to your domain Example: gitlab.valters.eu and that is about it.
- If you have an Nginx reverse proxy, then gitlab should open by going to http://your-domain.com, but if you don’t have it, then you will need to go to http://your-domain.com:801
sudo docker run --restart always --detach --hostname <your-hostname> --publish 800:443 --publish 801:80 --publish 22:22 --name <your-hostname> --restart always --volume /srv/Docker/gitlab/config:/etc/gitlab --volume /srv/Docker/gitlab/logs:/var/log/gitlab --volume /srv/Docker/gitlab/data:/var/opt/gitlab --volume /srv/Docker/gitlab/cgroup:/sys/fs/cgroup gitlab/gitlab-ce:latest ;If you have an Nginx-le container then you should run the container like so, to get an SSL secure connection:
Here you need to replace it with your hostname and with your e-mail. If you have an Nginx-le, then it will sign the Gitlab with an SSL. If for example, you don’t have nginx-reverse proxy and nginx-le and you want it, then click here
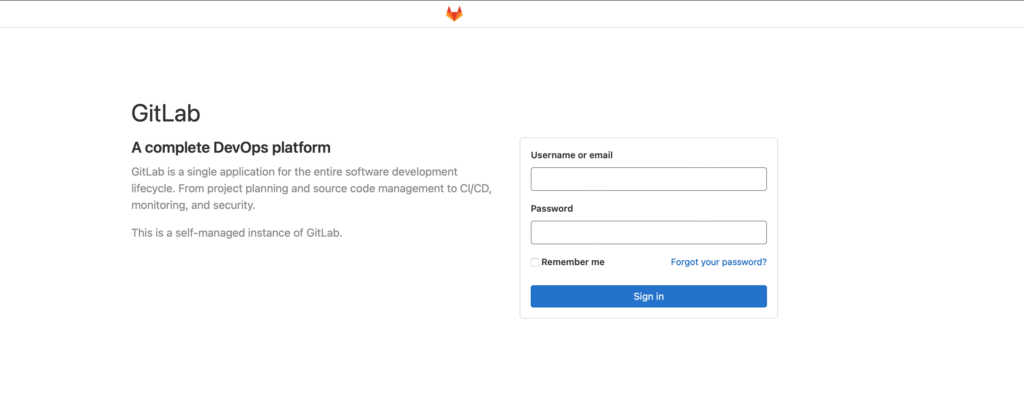
sudo docker run --restart always --detach --hostname <your-hostname> --publish 800:443 --publish 801:80 --publish 22:22 --name <your-hostname> --restart always --hostname=<your-hostname> -e VIRTUAL_HOST=<your-hostname> --env ADMIN_EMAIL=<your-email> --volume /srv/Docker/gitlab/config:/etc/gitlab --volume /srv/Docker/gitlab/logs:/var/log/gitlab --volume /srv/Docker/gitlab/data:/var/opt/gitlab --volume /srv/Docker/gitlab/cgroup:/sys/fs/cgroup gitlab/gitlab-ce:latest ;Once we start GitLab for the 1 time it will take up to 5 minutes to load, as it needs to start a lot of services inside the Docker container in a specific order for the system to work properly. If you used the command without Nginx-le then you need to go http://<your-ip-or-subdomain> if you used the command and have a fully working nginx-le then you need to go to https://<your-ip-or-subdomain>. If you don’t have an Nginx-reverse proxy ( That I think you should have ) then you need to go ://<your-ip-or-subdomain>:800
The installation is not done yet, as we would need to change our GitLab root password, and that we can do in our Linux terminal with the following command.
docker exec -it <your-hostname> gitlab-rake "gitlab:password:reset[root]"Password minimal length is 14 Digits.
Once, that all is done, you should have a fully working GitLab environment that you can use unlimited. The only restriction for the free version at the moment is that you can assign one Developer to the ticket. But other than that there are no restrictions. If you have followed this guide from A-Z then you shouldn’t have any issues.